Wallets

Apple Pay
Apple Pay enables secure, simple checkouts in your app or on your website
User Action: the buyer taps the Apple Pay button in the app or on the website, selects the payment card and uses the Touch-ID to complete the transaction.
- The Merchant App communicates with the merchant server and creates a transaction ID.
- The Merchant App obtains the encrypted transaction payload (The tokenized card data "DPAN", Cryptogram, and transaction details) from Apple's Pass Kit Framework.
- The Merchant App sends the encrypted transaction payload to processor API using the Apple Pay SDK.
- Processor API decrypts the encrypted transaction payload and processes the transaction.
- Processor API responds back to the Merchant App (through the SDK) with either an approval or decline
To get more information on participating banks and countries for Apple Pay, click here.
Integration
You need to create a "Merchant ID" and share the "Merchant Identifier" with the boarding team to get the CSR file.
1. Generate Payment Processing Certificate from Apple Portal
Steps to create a Payment processing certificate in the Apple portal:
- Login to Apple 'Account' in developer.apple.com
- In-order to generate certificate you must have a paid apple developer account or an organization account. New users must follow the prompts to set up a developer account.
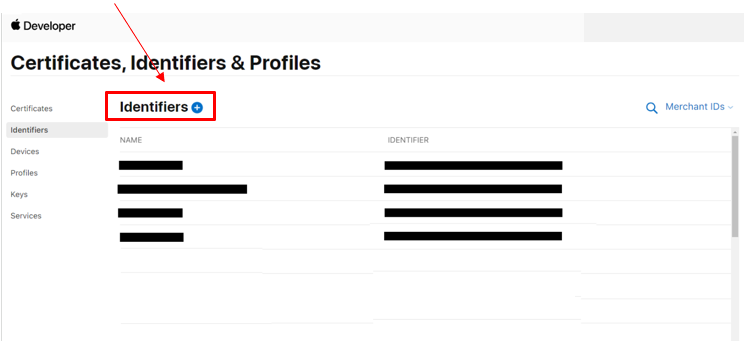
- Select Certificates, Identifiers and Profile :
Select Identifiers

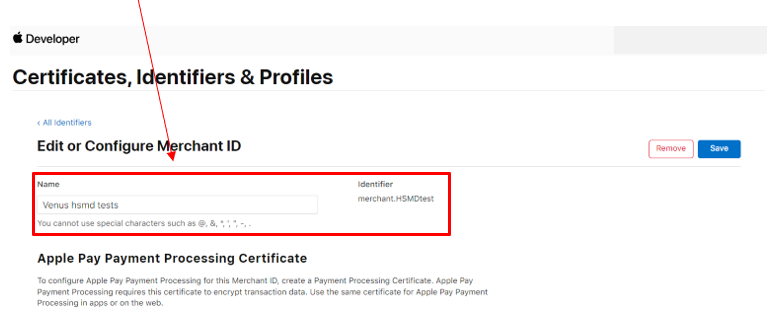
Enter a unique Merchant ID (Name field) and share the Identifier with your boarding team to get the CSR file.

Upload the CSR file in .pem format which you got from the boarding team under "Apple Pay Payment Processing Certificate".
- Once successfully uploaded, Apple provides the payment processing certificate.
- Send the Certificate (.cer file) back to the Boarding Team.
2. Upload and register the apple development certificate for your machine
- Request a new certificate from your keychain access.
- Follow the prompt and request the certificate to be saved on file.
- In the 'Certificate' section in the apple portal, click on the '+' and follow the prompt to request apple developer certificate for 'IOS' development.
- Upload the requested certificate.
- Download and install the apple pay developer certificate.
- Your machine is now setup for programming IOS app using Xcode.
3. Set-up Provision Profile for the application
- In the 'Certificate, Identifier and Profile' section in the apple portal navigate to profile.
- Click the '+' sign to create a new profile.
- Choose, 'IOS' development and follow the prompts
- In the capabilities select 'Apple Pay' and 'In-App Purchases'
- You can also register the test devices here using, uuid. (Xcode also does this when the app is built on the phone)
- Download the provision profile on to your mac.
4. Set-up Project in Xcode
- Select new xcode project with a single view or import an existing project.
- Register the app using the app-id in the apple portal under Identifier->appId
- Go to Xcode->Preferences,->accounts and install the downloaded provision profile, your profile is now linked to your Xcode.
- Click on your project, go to Signing & Capabilities select 'Automatically manage signing'.
- '+ capabilities' add apple pay.
- Under 'Apple Pay' click '+' and add the merchant id's registered in the portal, which in turn will be added to the entitlements file.
Now the Xcode is set-up for coding.
In the SDK enter the URL, api key and api secret and build the app:
- Merchant ID: Enter any valid merchant ID registered in the apple portal. This gives the capability for a single user to use multiple merchant id's
- Amount: Enter the amount of the transaction
- Transaction type: Select PreAuth or Sale.
- Apple Pay Button: Click this to produce payment sheet and fingerprint authentication for the transaction.
5. Usage
Once the user authenticates the transaction then Apple returns the payment token. As a result the SDK generates the payload that needs to be included the payment request towards the Gateway.
Encrypted Apple Pay
In order to start an encrypted Apple Pay transaction via the Gateway you need to send a primary transaction with requestType 'WalletSaleTransaction' including the walletPaymentMethod object called 'encryptedApplePay'.
Click for example request / response
Endpoint: .../payments-gateway/v2/payments
{

   "walletPaymentMethod":{
      "walletType":"EncryptedApplePayWalletPaymentMethod",
      "encryptedApplePay":{
      "data":"hbreWcQg980mUoUCfuCoripnHO210lvtizOFLV6PTw1DjooSwik778bH/qgK2pKelDTiiC8eXeiSwSIfrTPp6tq9x8Xo2H0KYAHCjLaJtoDdnjXm8QtC3m8MlcKAyYKp4hOW6tcPmy5rKVCKr1RFCDwjWd9zfVmp/au8hzZQtTYvnlje9t36xNy057eKmA1Bl1r9MFPxicTudVesSYMoAPS4IS+IlYiZzCPHzSLYLvFNiLFzP77qq7B6HSZ3dAZm244v8ep9EQdZVb1xzYdr6U+F5n1W+prS/fnL4+PVdiJK1Gn2qhiveyQX1XopLEQSbMDaW0wYhfDP9XM/+EDMLaXIKRiCtFry9nkbQZDjr2ti91KOAvzQf7XFbV+O8i60BSlI4/QRmLdKHmk/m0rDgQAoYLgUZ5xjKzXpJR9iW6RWuNYyaf9XdD8s2eB9aBQ=",

         "header":{
            "applicationDataHash":"94ee059335e587e501cc4bf90613e0814f00a7b08bc7c648fd865a2af6a22cc2",
           "ephemeralPublicKey":"MFkwEwYHKoZIzj0CAQYIKoZIzj0DAQcDQgAEvR+anQg6pElOsCnC3HIeNoEs2XMHQwxuy9plV1MfRRtIiHnQ6MyOS+1FQ7WZR2bVAnHFhPFaM9RYe7/bynvVvg==",
            "publicKeyHash":"KRsyW0NauLpN8OwKr+yeu4jl6APbgW05/TYo5eGW0bQ=",
            "transactionId":"31323334353637"

         },
        "signature":"MIAGCSqGSIb3DQEHAqCAMIACAQExDzANBglghkgBZQMEAgEFADCABgkqhkiG9w0BBwEAAKCAMIIB0zCCAXkCAQEwCQYHKoZIzj0EATB2MQswCQYDVQQGEwJVUzELMAkGA1UECAwCTkoxFDASBgNVBAcMC0plcnNleSBDaXR5MRMwEQYDVQQKDApGaXJzdCBEYXRhMRIwEAYDVQQLDAlGaXJzdCBBUEkxGzAZBgNVBAMMEmQxZHZ0bDEwMDAuMWRjLmNvbTAeFw0xNTA3MjMxNjQxMDNaFw0xOTA3MjIxNjQxMDNaMHYxCzAJBgNVBAYTAlVTMQswCQYDVQQIDAJOSjEUMBIGA1UEBwwLSmVyc2V5IENpdHkxEzARBgNVBAoMCkZpcnN0IERhdGExEjAQBgNVBAsMCUZpcnN0IEFQSTEbMBkGA1UEAwwSZDFkdnRsMTAwMC4xZGMuY29tMFkwEwYHKoZIzj0CAQYIKoZIzj0DAQcDQgAErnHhPM18HFbOomJMUiLiPL7nrJuWvfPy0Gg3xsX3m8q0oWhTs1QcQDTT+TR3yh4sDRPqXnsTUwcvbrCOzdUEeTAJBgcqhkjOPQQBA0kAMEYCIQDrC1z2JTx1jZPvllpnkxPEzBGk9BhTCkEB58j/Cv+sXQIhAKGongoz++3tJroo1GxnwvzK/Qmc4P1K2lHoh9biZeNhAAAxggFSMIIBTgIBATB7MHYxCzAJBgNVBAYTAlVTMQswCQYDVQQIDAJOSjEUMBIGA1UEBwwLSmVyc2V5IENpdHkxEzARBgNVBAoMCkZpcnN0IERhdGExEjAQBgNVBAsMCUZpcnN0IEFQSTEbMBkGA1UEAwwSZDFkdnRsMTAwMC4xZGMuY29tAgEBMA0GCWCGSAFlAwQCAQUAoGkwGAYJKoZIhvcNAQkDMQsGCSqGSIb3DQEHATAcBgkqhkiG9w0BCQUxDxcNMTkwNjA3MTg0MTIxWjAvBgkqhkiG9w0BCQQxIgQg0PLaZU4YWZqtP9t/ygv9XIS/5ngU6FlGjpvyK6VFXVMwCgYIKoZIzj0EAwIERjBEAiBTNmQEPyc3aMm4Mwa0riD3dNdSc9aAhslj65Us8b3aKwIgNSc/y+CWpsr8qDln0fZK6ZD/LWPMxofQedlPy7Q6gY8AAAAAAAA=",

         "version":"EC_v1",
         "applicationData":"VEVTVA==",
         "merchantId":"merchant.com.fapi.tcoe.applepay"
      }
   },

   "transactionAmount":{
      "total":"12.99",
      "currency":"USD"

   }

}
{

   "clientRequestId":"741666",
   "apiTraceId":"rrt-01b12ed35a0f32f98-c-ea-12855-958124-1",
   "ipgTransactionId":"84290618651",
   "orderId":"R-3f8d4c21-66c9-47d4-bb59-c7f167ace094",
   "transactionType":"SALE",
   "transactionOrigin":"ECOM",
   "paymentMethodDetails":{

      "expiryDate":{

         "month":"**",
         "year":"****"
},
      "bin":"******",
      "last4":"****",
      "brand":"AMEX"
},
   "paymentMethodType":"PAYMENT_CARD",
   "country":"USA",
   "terminalId":"1588390",
   "transactionTime":1579707422,
   "approvedAmount":{

      "total":12.00,
      "currency":"USD",
      "components":{

         "subtotal":12.00
},
      "transactionStatus":"APPROVED",
      "schemeTransactionId":"010022066071191",
      "processor":{

         "referenceNumber":"84290618651 ",
         "authorizationCode":"OK4090",
         "responseCode":"00",
         "network":"AMEX",
         "associationResponseCode":"000",
         "responseMessage":"APPROVAL",
         "avsResponse":{

            "streetMatch":"Y",
            "postalCodeMatch":"Y"

}

},
      "additionalDetails":{

         "walletProvider":"APPLE_PAY"

}

}

}
Decrypted Apple Pay
If you wish to decrypt the payload on your side, you can also start a decrypted Apple Pay transaction. For this purpose, you need to send a primary transaction with requestType 'WalletSaleTransaction' including the walletPaymentMethod containing the following objects:
walletTypewith value 'DecryptedApplePayWalletPaymentMethod'decryptedApplePaycontainingaccountNumber,expirationandcryptogram
Endpoint: .../payments-gateway/v2/payments
{"requestType":"WalletPreAuthTransaction","transactionAmount":{"total":"15.00","currency":"GBP"},"order":{"billing":{"name":"Prename Lastname","contact":{"mobilePhone":"123456789","email":"[email protected]"}}},"merchantTransactionId":"97f0ffc860xxx7481da42780","storeId":"1301xxx8733","walletPaymentMethod":{"walletType":"DecryptedApplePayWalletPaymentMethod","decryptedApplePay":{"accountNumber":"537212XXXXXX9662","expiration":"022026","cryptogram":"MDwCsAM4+xxxzq2AoABFIA="}}}
Apple Pay on the web
Apple Pay on the web allows making purchases on the web in Safari on your iPhone, iPad, or Mac. You can use Apple Pay without having to create an account or fill out lengthy forms. Moreover, with Touch ID on MacBook Air and MacBook Pro, the payment process takes just a touch and is quicker, easier, and more secure than ever before.
The checkout process for Apple Pay on web can be initiated in Safari browser with “Apple Pay” button that you place on your website either as a specifically alternative checkout option or next to other payment methods that you offer.
When consumers click this button, you construct a Sale or PreAuth transaction request, with the required parameters including the payment method parameter. This will take your customers to a hosted page from where they can be redirected directly to the Apple Pay payment screen, with list of cards added to customers’ Apple Pay wallet. Selecting the card by customers from the list and authenticate using Touch id/Face id on Apple device would complete the payment.
Alternatively, you can let your customer select the payment method on the gateway’s hosted payment method selection page. If you prefer that option, simply do not submit the payment method parameter.
Apple Pay on the web transaction can only be initiated with Apple’s Safari browser and authorization from an iOS device like iPhone, Apple Watch or MacBook.
The generic fields to be considered:
| Field Name | Description |
|---|---|
checkoutoption | Set the value for this parameter to ‘combinedpage’ |
paymentMethod | Set the value 'applePay' for preselection of Apple Pay as payment method |

Google Pay
Google Pay is the fast, simple way to pay in millions of places – online, in stores, and more. It brings together everything you need at checkout and keeps your information safe and secure.
User Action: the buyer taps the "Google Pay" button, and then selects a payment method and shipping address.
If the purchase originates from a third-party site
- The merchant/client server issues a credential request with the Merchant ID and Processor Name as Fiserv to Google.
- Google returns response with encrypted payment credentials signed with the Fiserv key to the merchant server.
- The Merchant sends the encrypted payload to Fiserv.
- Fiserv decrypts and validates the payload, and then processes the transaction and responds back to merchant with either an approval or decline response.
If the purchase originates from a Google site:
- Google initiates a purchase request to the merchant after the consumer confirms order.
- The merchant/client server issues a request with the Merchant ID and Processor Name as Fiserv to Google.
- Google returns response with encrypted payment credentials signed with the Fiserv key to merchant server.
- The merchant sends the encrypted payload to Fiserv.
- Fiserv decrypts and validates the payload and process the transaction and respond back to merchant with either an approval or decline response.
To get more information on participating banks and countries for Google Pay, click here.
Integration
Google Pay enables developers to add payment processing to merchants’ Android-compatible apps and on Chrome on Android. These APIs allow consumers to pay with any credit card they have stored in their Google account, including any cards they may have previously set up on their Android Pay digital wallet. Consumers may also add a new payment account.
The target audience for this document is a developer who wants to use Google Pay in their payment application.
Merchant Boarding
Please reach out to your local Integration support team for getting your account enabled.
Prerequisites to build and run the sample Application
Developers wishing to use the Fiserv Google Pay sample application will need the following software and hardware:
- Google Play Services version 18.0.0
- A physical device or an emulator to use for developing and testing. Google Play services can only be installed on an emulator with an AVD that runs Google APIs platform based on Android 4.4 or higher.
- The latest version of Android Studio. This includes:
o The latest version of the AndroidSDK, including the SDK Tools component. The SDK is available from the Android SDK Manager. - JavaJRE(JDKfordevelopment) as per Android SDK requirements.
Your project should be able to compile against Android 4.4 (KITKAT) or higher.
For more details, please refer https://developers.google.com/pay/api/android/guides/setup
1. Making Application Changes
The following parameters need to be defined:
a. Merchant ID
b. Merchant Token
c. APIKey
d. APISecret
Define the Fiserv Object Parameters: Parameters must be updated in the following files:
Constants.javaEnvData.java
Update the Constants.java file with the Merchant ID and Gateway Tokenization parameters. Note that:
- The Merchant ID will be shared by the Integration team and
- The Gateway Tokenisation parameter defaults to ‘Fiserv’.
In the EnvData.java file, set the following environment variables, which will be shared by the Integration Team:
- APIKey
- Token
- APISecret
Gateway Merchant ID and the APIGEE credentials will be provided by the Integration Team.
2. Credit Card for Testing
Note that even for testing purpose; the credit card information used in the app must be attached to an active account.
The standard test cards will not be validated by Google and will fail in processing.
3. Execute Authorize and Purchase Request
Fiserv Header Authorisation Parameter
The Authorisation parameter, required as part of the Header for a Fiserv API transaction, is created as follows:
Construct the data param by appending the following parameters in the order shown:
apikey – the developer’s API key
nonce – A secure random number
timestamp – Epoch timestamp in milliseconds
token – the Merchant Token
payload – The actual body content passed as the POST request
4. Google Pay APK Installation to Device
- Once the downloaded code for the sample app is built successfully in Android Studio, build the APK and install it on your device.
- Once the APK is installed, select the Open option to access the application. The screenshots below show the sample application installed on the test device (non PROD environment), and the response from a payment processed in the Fiserv non PROD environment/Google test environment.
Note that the Payment Details page cannot be captured for security reasons.
Note that the Payment Details page cannot be captured for security reasons.
The following example shows the actual request response being sent / received:
{

  "requestType": "WalletSaleTransaction",
  "walletPaymentMethod": {
    "walletType": "EncryptedGooglePayWalletPaymentMethod",
    "encryptedGooglePay": {
      "data": {
        "encryptedMessage": "8nxjB9mr2tWZeDRQRcGN91UUnb7AioGp3oRo8kmQ6lyvJZiqD7PJlbRCYElNqUmr6Z8zK7b2gO9MKOjpnTCqH0qAe2vuIlwNXB60M2Lh7Qfl3bVgWzwF/FfFcenVW381hoItYi8AjWnWoydz1XMTEv2qhqUG03mEnRXdMyDyk6KKZXoW8Qc0p1F1thbxxu8weU8CZbZsWGGTjB42cilIqLVbribcOAG8Oas1AcgefFsu2hwp4gdSuOg7wmeSV7XKsGQzzVy85qtjuqET2XYzJE3K/Wh9QKkhu5P9Ms5s1+Smr2IjRyidqQa88SxQplrVoo9+PvT0bxFcMspBmO3pLkuaZSUBy++dL2fefcxNJvGCFfFhdxW9DojuuQxgpeu7RAQUsGLyFmr/4ZfBxt882xTmpX9MRx5CAudl9qUgBfKdwWwMX35qSbDTm1ju5XXzNh94VebjD3bB9Zj8qgbmUOr/+6OQLhoFJyBCXgx3EEH8hBwNVFrss/SLwQvFhZh62eO6lOtnmbOtP1yTDDVqGDBfai5SwAmM+KTcc9SGv/xDC+cWe8ck+aCBkG4HoRPapUVMZ3JIgV7yzTsVLJE\\u003d",
        "ephemeralPublicKey": "BGH3fRFdoAobYrAlxnZOCYzkH84Cna92IZxtgsU36CMDaqSaDYb9/LsY8qw+vMtlBnwsUg/YVMOeeKp+qDkOWb4\\u003d",
        "tag": "nvmOUNpnOTZULLhMxT/hWCHzH/4f7gGpfvQgwl3p8ng\\u003d"
      },
      "signature": "MEUCIFWTRWUZAOM5nfJC79FtJm56olnbwG4H5uWWxAUWAquiAiEA24j/BcOroeISsdJzYsyoVi8wzu4tnmKw+jdsGfuvPko=",
      "version": "ECv1"
    }
  },
  "transactionAmount": {
    "total": "1200",
    "currency": "USD"
  }
}
{

  "clientRequestId": "741666",
  "apiTraceId": "rrt-01b12ed35a0f32f98-c-ea-12855-958124-1",
  "ipgTransactionId": "84290618651",
  "orderId": "R-3f8d4c21-66c9-47d4-bb59-c7f167ace094",
  "transactionType": "SALE",
  "transactionOrigin": "ECOM",
  "paymentMethodDetails": {
    "paymentCard": {
      "expiryDate": {
        "month": "**",
        "year": "****"
      },

      "bin": "******",
      "last4": "****",
      "brand": "AMEX"

    },

   "paymentMethodType": "PAYMENT_CARD"

  },

  "country": "USA",
  "terminalId": "1588390",
  "transactionTime": 1579707422,
  "approvedAmount": {
    "total": 12.00,
    "currency": "USD",
    "components": {
      "subtotal": 12.00

   }

  },

  "transactionStatus": "APPROVED",
  "schemeTransactionId": "010022066071191",
  "processor": {
    "referenceNumber": "84290618651 ",
    "authorizationCode": "OK4090",
    "responseCode": "00",
    "network": "AMEX",
    "associationResponseCode": "000",
    "responseMessage": "APPROVAL",
    "avsResponse": {
      "streetMatch": "Y",
      "postalCodeMatch": "Y"
    }

  },

  "additionalDetails": {
    "walletProvider": "GOOGLE_PAY"

  }

}
Google Pay on the web
The checkout process for Google Pay can be initiated with a “Google Pay” button that you place on your website either as a specifically alternative checkout option or next to other payment methods that you offer.
When consumers click this button, you construct a Sale or PreAuth transaction request, with the required parameters including the payment method parameter. This will take your customers to a hosted page from where they can be redirected to the Google Pay payment screen, with list of cards added to customer Google Pay wallet. Selecting the card by customers from the list and clicking the ‘Pay’ button would complete the payment.
Alternatively, you can let your customer select the payment method on the gateway’s hosted payment method selection page. If you prefer that option, simply do not submit the payment method parameter.
The generic fields to be considered:
| Field Name | Description |
|---|---|
checkoutoption | Set the value for this parameter to ‘combinedpage’ |
paymentMethod | Set the value 'googlePay' to preselect Google Pay as payment method |
Google Pay REST API integration
The documentation for the REST API integration can be found here.
Updated 9 months ago