Introduction

🚧

Early access mode

Our brand new Checkout Solution is in early access mode currently available in EMEA region only. If you are interested in using this solution then please contact us via our support page

If you are looking for information on our classic hosted payment page integration, please click here

Overview

Our checkout solution provides an easy, quick and secure way for you to start accepting payments online.

Your customers choose the products or services on your website or in your mobile app and when they proceed to checkout, our secure solution takes care of the payment process:

  • No need for you to have any sensitive payment information on your systems, complying with the Payment Card Industry Data Security Standard (PCI DSS) becomes easy
  • In-built cardholder authentication with 3-D Secure, handling the interaction with your customer's card issuer
  • Easy access to Alternative Payment Methods with no separate integration
  • Optimised for usage on different devices - desktop, mobile, tablet
  • Support for multiple languages and currencies
  • Reduces the chance of error with basic validations and supportive information and warnings
  • Highly customizable to match your corporate brand design and preferences

There are two aspects to Checkout Solution.

  • Checkout Builder - Customize and configure your payment page.
  • Public APIs- Use the default page and just start accepting payments for your online store.

Amazingly, you can use our public APIs at any given time to create a checkout page for accepting payments irrespective/independent of Checkout Builder. We then offer you a default payment page for your paying customer.

Integrate with our Checkout Solution

You can start accepting payments with default pre-built checkout pages or customize the user interface for complete control over your checkout experience.

Steps to follow

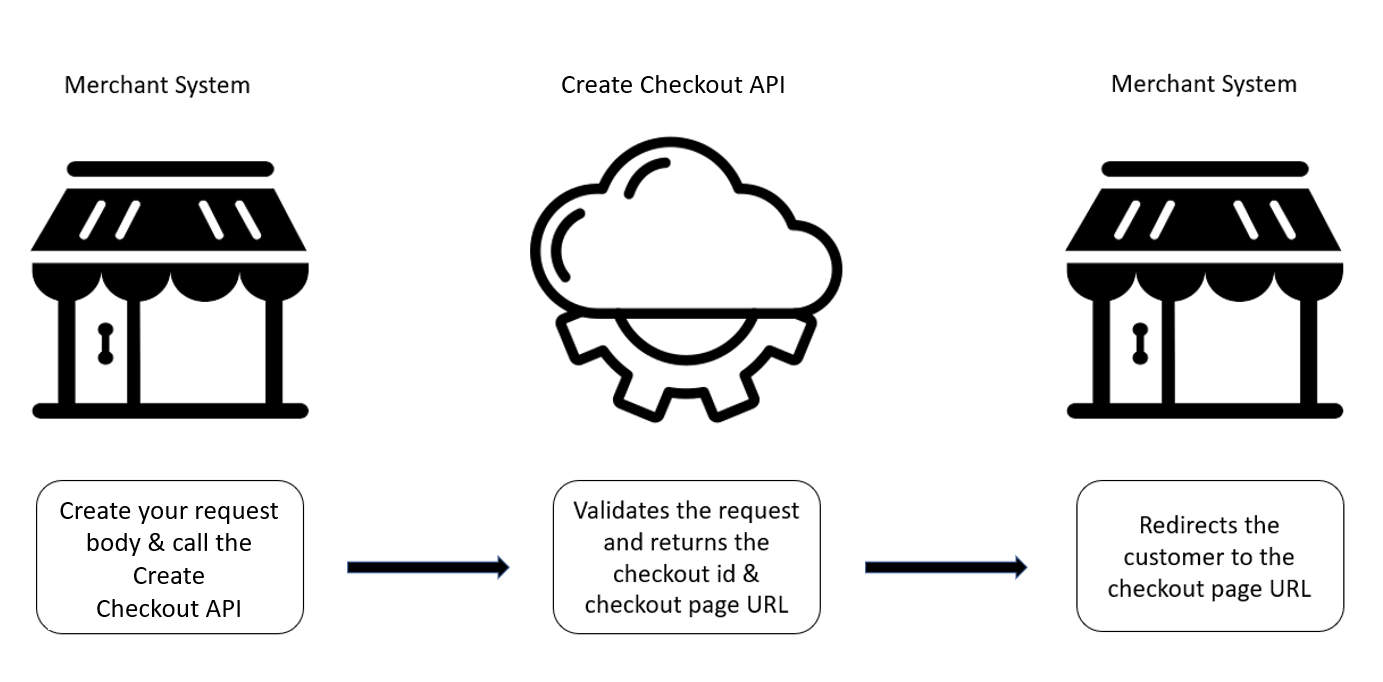
1. Create a payment transaction request

You can create a sample request of your own or you can use the following sample request (a very basic one) to call our API:

{
  "storeId": "120995000",
  "transactionType": "SALE",
  "transactionAmount": {
    "currency": "EUR",
    "total": "12.99"
}

A wide range of further parameters allows you to include things like billing and shipping address, order details, settings for 3-D Secure exemptions, your own transaction identifiers, etc.

After your successful request, you get a URL for the redirection of your customer to our solution and a checkout ID.

{
  "checkout": {
    "storeId": "120995000",
    "checkoutId": "b00c083a-bacf-44aa-b64a-efee15dcb4ba",
    "redirectionUrl": "https://ci.checkout-lane.com/#/?checkoutId=b00c083a-bacf-44aa-b64a-efee15dcb4ba"
  }
}

2. Redirect your customer

Once you have received a success response from our API, use the redirectionURL , to redirect your customer to your active checkout page.

Webhooks

We use webhooks to notify you the moment a transaction changes its status.

📘

Before you enable webhooks

  • Create a webhook endpoint on your server (HTTP endpoint)
  • Make sure it accepts POST requests with a JSON payload

Configure Webhooks

To start receiving webhook notifications, you can specify a webhook URL when sending the API request for creation of a checkout. Here's a sample request:

{
  "transactionType": "SALE",
  "transactionAmount": {
    "total": 25,
    "currency": "EUR"
  },
  "storeId": "12345678",
  "checkoutSettings": {
      "webHooksUrl":"https://webhook.site/50d0a452-2785-45fb-ab7a-468cf21d4f36"
  }
}

Here's a what a webhook event will look like when received on the specified request URL:

{
    "retryNumber": 0,
    "storeId": "12345678",
    "checkoutId": "5qnq1E",
    "orderId": "91e95c4d-9949-438e-8650-1457188ef016",
    "transactionType": "SALE",
    "approvedAmount": {
        "total": 25,
        "currency": "EUR",
        "components": {
            "subtotal": 20,
            "vatAmount": 2,
            "shipping": 3
        }
    },
    "transactionStatus": "APPROVED",
    "paymentMethodUsed": {
        "cards": {
            "cardNumber": "123456******7890",
            "expiryDate": {
                "month": "12",
                "year": "2024"
            },
            "brand": "VISA"
        }
    },
    "ipgTransactionDetails": {
        "ipgTransactionId": "84632773344",
        "transactionStatus": "APPROVED",
        "approvalCode": "Y:758396:4632773344:YYYM:032018"
    }
}

Specifying checkout page settings

You can control the checkout page settings such as language, redirect URL & webhook URL based on the transaction status. For example:

{
    "transactionType": "SALE",
    "transactionAmount": {
        "total": 25,
        "currency": "EUR"
    },
    "storeId": "12345678",
    "checkoutSettings": {
        "webHooksUrl":"https://webhook.site/50d0a452-2785-45fb-ab7a-468cf21d4f36",
        "locale": "nl_NL",
        "redirectBackUrls": {
            "successUrl": "https://www.success.com/",
            "failureUrl": "https://www.failureexample.com"
        }
    }
}

Listed below are "locale" values that needs to be passed in the API for the respective language in which the checkout page created will appear:

LanguageValue to be passed in API request
British Englishen_GB
US Englishen_US
Germande_DE
Polishde_PL
Dutchnl_NL

Preselect a payment method for a specific checkout

While making an API call for creating a checkout, a payment method can be specified for accepting the payment. Following is a sample request for a preselected payment method:

{
    "transactionType": "SALE",
    "transactionAmount": {
        "total": 25,
        "currency": "EUR"
    },
    "storeId": "12345678",
    "checkoutSettings": {
        "preSelectedPaymentMethod": "Cards",
        "redirectBackUrls": {
            "successUrl": "https://www.success.com/",
            "failureUrl": "https://www.failureexample.com"
        }
    }
}

Following values for the respective payment methods should be passed in the API request to specify a Payment method:

Payment MethodValue to be passed in API request
CardsCards
PayPalPayPal

Creation of token for a card

As a merchant, if you want to use the token to process the payment, you need to pass the following parameters.

{
    "transactionType": "SALE",
    "transactionAmount": {
        "total": 25,
        "currency": "EUR"
    },
    "storeId": "12345678",
    "checkoutSettings": {
        "redirectBackUrls": {
            "successUrl": "https://www.success.com/",
            "failureUrl": "https://www.failureexample.com"
        }
    },
    "paymentMethodDetails": {
        "cards": {
            "createToken": {
                "customTokenValue": "Test1234567",
                "declineDuplicates": true,
                "reusable": false,
                "toBeUsedFor": "UNSCHEDULED"
            }
        }
    }
}

For more information on the request body parameters, kindly refer the createToken object here.

If the merchant did not pass the value for the customTokenValue parameter, a token value gets created and returned to the merchant. The merchant receives token ID with the help of webhooks along with the other transaction information. Merchant must save the token if he wants to reuse the token for future transactions.

Save cards details on payment page for the paying customer

If a merchant has enabled "Save card details" option on the Checkout Builder for respective Checkout page, then the paying customer can choose to tokenize the card details and agree to send it the token to merchant for reusing the same for future payments without entering the details again.

This option is not enabled for the Default payment page.

Use a token for a payment transaction

If you have a previously generated token that can be used for further transactions, you can pass that when creating the checkout via our API. Here's a sample request of how it can be done:

{
    "transactionType": "SALE",
    "transactionAmount": {
        "total": 25,
        "currency": "EUR"
    },
    "storeId": "12345678",
    "checkoutSettings": {
        "redirectBackUrls": {
            "successUrl": "https://www.success.com/",
            "failureUrl": "https://www.failureexample.com"
        }
    },
    "paymentMethodDetails": {
        "cards": {
            "tokenBasedTransaction": {
                "value": "Test1234567",
                "transactionSequence": "SUBSEQUENT"
            }
        }
    }
}

Since its a token that represents a card and no further input is required from the paying customer, the returned "redirectionUrl", when clicked or redirected upon will just process the transaction and will skip displaying the Checkout page completely.

Want a quick overview?