Payment Links
You can accept payments from the customer by sharing a payment link via chat, email, SMS, or any other channel. Customers can complete payments on their own device by clicking the payment link.
The link redirects your customer to Fiserv's new checkout solution, where customer can select the payment method.
Checkout is accessible from all type of devices such as mobile, tablet, or desktop.
Why use payment links?
- Creating a payment link is easy, and you can share it with the customers.
- Customers can receive the payment links via email, SMS, or chat. Customers can pay quickly by using this payment link.
- You can set an expiry date and time to the payment link, after which the link expires.
How payment links works
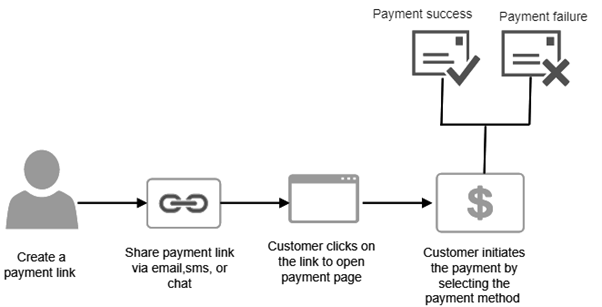
- You can generate a payment link by providing the required details in the API request.
- Share the payment link with your customer via email, SMS, chat, or another channel. The customer clicks on the payment link to open the payment page (Fiserv's checkout solution).
- The customer can choose the payment method and process the payment.
- Customer is redirected to success or failure page based on the payment status
View Transaction Status
If the payment is a success, the customer is redirected to the payment success page with the transaction details; else, the payment failure page with the reason for the decline gets displayed.
Generate a Payment Link
You can generate a payment link by using Fiserv's APIs or Virtual Terminal, and share it with your customer for accepting payments.
Before you begin
- A valid merchant account or test account with us along with your login credentials.
- A developer account registered with us. You will need a developer account to access our APIs.
Sample Request & Response
Click for example request / response
{
    "storeId": "760995100",
    "transactionType": "PREAUTH",
    "merchantTransactionId": "merchant1",
    "merchantId": "merchant1",
    "transactionAmount": {
        "total": "719",
        "currency": "USD"
    }
}
{
  "paymentLinkURL": "https://ecom-dev-paymentpage.whirlpool.aws.fisv.cloud/pl/dBpYUi",
  "id": "dBpYUi"
}
Request : In the above request, only mandatory parameters are used that are must for a successful API call. However, there are many other optional parameters that can be used for different purposes. Please find all of them elaborated here.
Response : In the response to generating a payment link API request, you will get a payment link URL and payment link ID. You can copy the URL from the response and share it with your customer. Following is the sample response along with status code 200 for the generate payment link request.
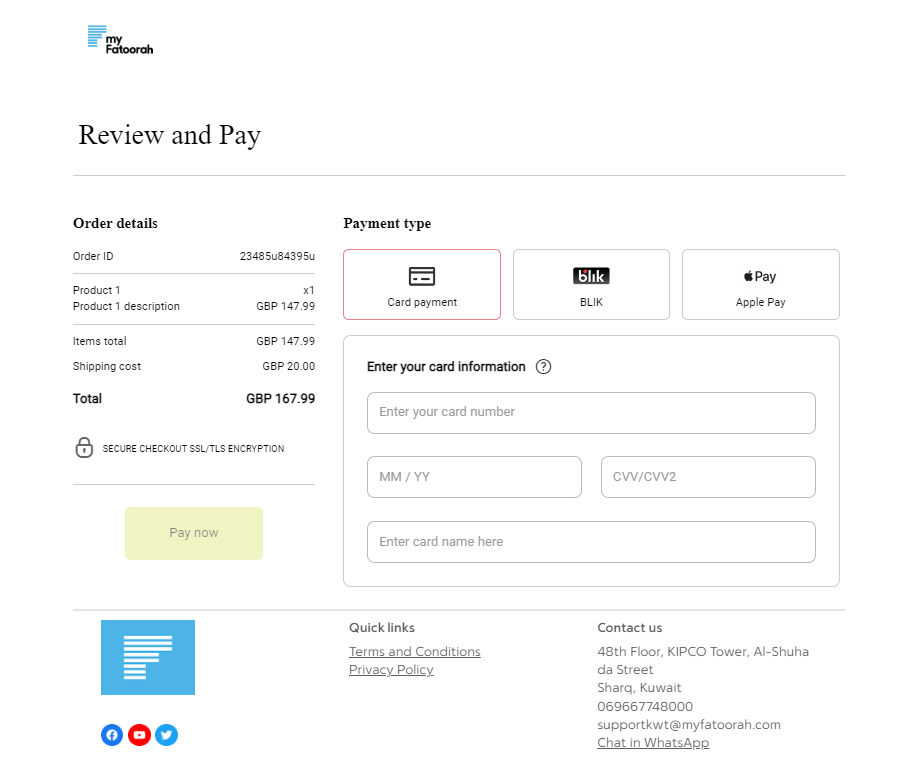
To open the payment page, copy the URL from the response and paste the same in the browser. Following image is the example payment page:
Payment Link Details
You can get payment link details by using payment link ID. To get payment link details, you need to pass the payment link ID (for example- "pPhaKh") as URI Parameter.
Following is the sample response of the details received after the payment link ID is passed:
{ "paymentLink": { "active": true, "paymentLinkId": "pPhaKh", "expiryDateTime": "2023-01-05T08:21:35.625533Z" }, "checkoutId": "7ce2e740-fe99-4a0d-9956-7d6d9a6ffdb6", "storeId": "1109950006", "orderId": "PL-da502b8a-8e45-4ec4-b0bf-1b53f492cf78" }
For more details on this API, please click here.
Enable Webhooks
If there's an active payment page create via checkout builder, the cardholder will be redirected to that page by clicking the payment link. If there is no active payment page associated with the store ID, you are directed to the default payment page.
You can enable webhooks for an active hosted payment page using the checkout solution or specifications API.
Using API's
While creating the transaction via our public API, you can also specify your webhook URL in the "webHooksURL" parameter. Please find a sample request below for the same:
Webhook sample request:
{
  "storeId": "1109950006",
  "transactionType": "SALE",
  "transactionAmount": {
    "total": 15.99,
    "currency": "EUR",
    "components": {
      "subtotal": 10,
      "vatAmount": 2,
      "shipping": 2,
      "localTax": 1.99
    }
  },
  "order": {
    "orderId": "31da1addc129a",
    "orderDetails": {
      "discountCode": "TRYNEW",
      "purchaseOrderNumber": "123055342",
      "invoiceNumber": "96126098",
      "dynamicMerchantName": "Merchant XYZ",
      "customerId": "1234567890"
    },
    "basket": {
      "lineItems": [
        {
          "itemIdentifier": "Item001",
          "name": "Mobile",
          "price": "10",
          "quantity": "2",
          "valueAddedTax": "2",
          "shippingCost": "1",
          "miscellaneousFee": "0",
          "total": "15"
        }
      ]
    }
  },
  "checkoutSettings": {
    "webHooksUrl": "http://ecom-paymentpage-playground:9001/webHooks",
    "redirectBackUrls": {
      "successUrl": "https://www.success.com/",
      "failureUrl": "https://en.wikipedia.org/wiki/Failure"
    }
  },
  "transactionOrigin": "ECOM",
  "merchantId": "199950008",
  "merchantTransactionId": "AB-1234"
}
Webhooks notification
You can receive webhook notifications when a transaction is performed with all the information related to the event.
Following is the sample webhook notification for a card payment _
Please note that based on the payment method used, webhook notification might differ.
 [
  {
    "id": "31311b20-5312-426f-a17a-bca009e105a8",
    "retryNumber": 0,
    "type": "hpp.transaction.success",
    "storeId": "1109950006",
    "merchantTransactionId": "merchant1",
    "hppTransactionId": "8dfdc537-4475-4db8-a1eb-88cc710f8a56",
    "ipgTransactionId": "84404678970",
    "ipgTransactionStatus": "APPROVED",
    "transactionType": "SALE",
    "paymentMethod": "card",
    "approvedAmount": "1828.00",
    "approvedAmountCurrency": "EUR",
    "dccAccepted": false,
    "tokenId": "11B849FB-3FCC-4B5B-926E-9CA926653115",
    "tokenReusable": true,
    "declineDuplicateToken": false
  }
]
Updated 13 days ago